Your circular saw or miter saw used to glide through lumber like a hot knife through butter. Now the cuts are rough, the motor strains, and the wood fibers tear instead of slice. Before you toss that blade in the trash, consider this: learning how to sharpen a saw blade properly can save you money and restore factory-level performance. Most modern blades are carbide-tipped, which means they need special care, but the payoff in cut quality is worth it.
This guide breaks down the differences between carbide and steel blades, explains why professional sharpening usually wins, and shows you when replacement makes more sense. You’ll also learn the cleaning trick that tricks many users into thinking their blade is dull when it just needs a good scrub.
Why Carbide-Tipped Blades Need Special Handling
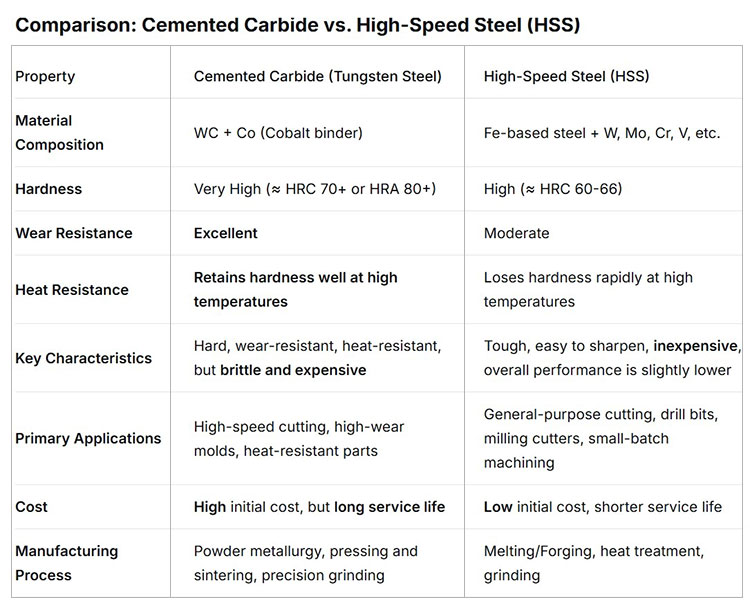
Carbide-tipped blades dominate today’s power tools for one simple reason: tungsten carbide is far harder than high-speed steel. This extreme hardness keeps the edge sharp through hundreds of cuts, even when slicing abrasive materials like plywood, MDF, or pressure-treated lumber.
During manufacturing, each tooth is ground to a precise angle and shape. This uniformity ensures smooth, vibration-free performance. Once that edge dulls, however, restoring factory precision is a serious challenge, especially with anything short of professional equipment.
Hand Sharpening Carbide: Why It Usually Fails
Standard Files Cannot Cut Carbide
Grabbing a metal file is the first instinct for many DIYers, but it simply does not work. Carbide ranks around 9 on the Mohs hardness scale, and only diamond is harder. A standard file will wear down in seconds without making meaningful contact with the tooth edge.
Inconsistent Geometry Ruins Cut Quality
Even if you manage to hone a few teeth, replicating the original bevels, rake angles, and tooth heights across 40 or 60 teeth by hand is nearly impossible. Small variations create:
- Uneven cutting pressure across the blade
- Increased vibration during operation
- Rougher finishes on your workpiece
- Premature strain on the saw motor
These inconsistencies hurt both performance and safety.
Safety Risks Multiply with Poor Sharpening
An unbalanced or unevenly sharpened blade wobbles at high speeds. This wobble can cause kickback on table saws, loud vibration, and potential damage to the saw’s arbor. A blade that looks sharp but cuts poorly is often misshapen rather than dull.
Professional Sharpening: The Reliable Choice
Precision Grinding Restores Factory Edges
Professional sharpening services use diamond-coated grinding wheels mounted on CNC or jig-guided machines. These tools replicate the original grind angles with micron-level accuracy, ensuring every tooth cuts uniformly.
The typical process includes:
- Thorough cleaning of the blade
- Inspection for cracks or damage
- Re-grinding each tooth to original specs
- Final balancing for smooth operation
The results are often indistinguishable from a brand-new blade.
How Many Times Can a Blade Be Sharpened?
Most carbide-tipped blades can be sharpened one to two times before the carbide tips become too small to maintain structural integrity. Each sharpening removes roughly 0.001 to 0.002 inches of material. After two rounds, there is often not enough carbide left to support the tooth under load.
Tip: Keep a sharpening log. If your blade has already been resharpened once, plan for replacement at the next sign of dullness.
Cost vs. Value of Professional Service
Professional sharpening typically runs $25 to $35 per blade. Compare that to a mid-range replacement at $40 to $60, or a premium blade like a Diablo or Freud at $80 or more. For high-end blades, sharpening is a smart way to extend life. For budget blades, replacement often makes more financial sense.
DIY Sharpening Options That Actually Work
DIY methods are not recommended for full restoration, but some touch-ups can help with minor dullness when done carefully.
Diamond Files for Light Honing
Diamond-coated files are one of the few hand tools capable of abrading carbide. They grind rather than cut, making them suitable for light work.
Best for:
– Removing small nicks
– Refreshing slightly dulled edges
– Maintaining low-use blades
Limitations:
– Requires a very steady hand
– Difficult to maintain a consistent angle
– Easy to over-file a single tooth
Pro tip: Mark each tooth with a marker before filing. This visual cue helps ensure you file every tooth exactly once.
Dremel Tools: Risky Without a Jig
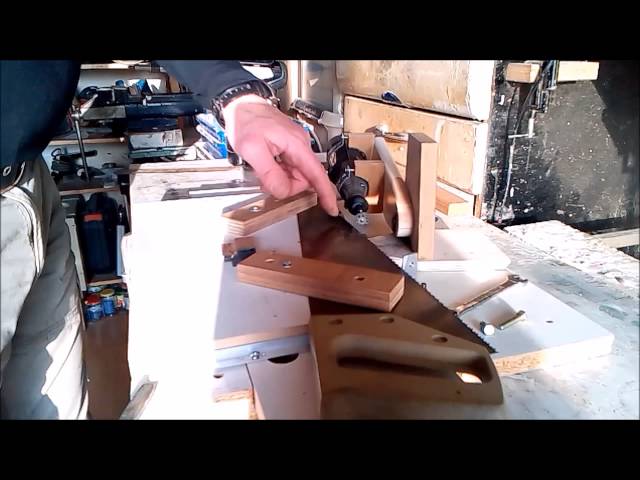
A rotary tool like a Dremel with a diamond bit removes material quickly, but control is a major issue. Freehand grinding leads to uneven tooth height, altered hook angles, and overheating that causes micro-cracking.
Only attempt this method if you have a sharpening jig that holds the tool at the correct angle.
Custom Jigs for Better Consistency
Woodworker Mathias Wandel designed a popular DIY jig that clamps to a Dremel, aligning the grinding bit with the tooth’s original angle. This setup improves consistency and reduces human error.
Jig advantages include:
– Repeating the same angle across every tooth
– Limiting depth of cut
– Reducing the risk of overheating
This approach is still not a full replacement for professional service, but it works well for minor field repairs or hobbyists maintaining low-use blades.
Warning: Even with a jig, monitor temperature closely. Dip the tooth in water frequently to prevent heat buildup, which can ruin the brazed joint holding the carbide tip.
When Replacement Beats Sharpening
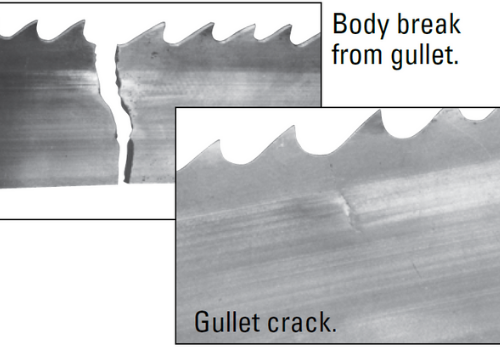
Sharpening is not always the right answer. Replace your blade if you notice any of these warning signs.
Chipped or Broken Teeth
Missing or cracked carbide tips create uneven cutting forces. No amount of sharpening can restore lost material.
Visual cue: Look for jagged edges or missing chunks on the tooth corners.
Insufficient Carbide Remaining
If the carbide layer is worn down to less than half its original thickness, further sharpening risks exposing the steel body. Once the joint between carbide and blade body is compromised, the tip can detach during use, creating a serious safety hazard.
Shallow Gullets Cannot Clear Sawdust
The gullets (valleys between teeth) carry away sawdust during cutting. Repeated sharpening reduces gullet depth over time.
When gullets become too shallow:
- Sawdust packs into the kerf
- Blade overheats quickly
- Cutting becomes sluggish and rough
Rule of thumb: If gullets are less than 70 percent of their original depth, replace the blade.
Persistent Rough Cuts After Cleaning
Before blaming dullness, clean the blade thoroughly. Resin and pitch buildup mimic dullness by increasing friction.
Clean with:
– A citrus-based degreaser such as Simple Green
– An old toothbrush
– Warm water rinse
Let the blade dry completely before reinstalling it. If cuts remain poor after cleaning, and the blade has never been sharpened professionally, send it out for service. If it has already been sharpened twice, replace it.
Clean the Blade Before Doing Anything Else

A dirty blade fools many woodworkers into thinking they need to sharpen. Sap, pitch, and resin accumulate on the teeth and body, creating drag and smoke during cuts.
Follow this cleaning process:
- Remove the blade from the saw
- Soak in Simple Green or a dedicated blade cleaner for 10 to 15 minutes
- Scrub teeth and surfaces with a stiff-bristled brush
- Rinse with clean water
- Dry thoroughly with a lint-free cloth
Pro tip: Hang the blade or lay it flat to dry. Never stack wet blades together.
After cleaning, test the saw on scrap wood. Many users are surprised how much performance improves with just a simple scrub.
Sharpening vs. Replacement Decision Guide
| Blade Condition | Recommendation |
|---|---|
| Light dullness, clean blade | Try professional sharpening |
| Never sharpened, minor wear | Yes, worth sharpening |
| Already sharpened once | Possible, but inspect carefully |
| Already sharpened twice | Replace |
| Chipped or broken teeth | Replace |
| Shallow gullets | Replace |
| Premium blade (Diablo, Freud) | Sharpen to save cost |
| Budget blade | Replace |
For frequent users, keeping a spare high-quality blade on hand lets you rotate usage and extend overall lifespan.
Pro Tips for Longer Blade Life
Prevent Premature Dullness
- Cut clean, dry wood whenever possible
- Avoid contact with nails, staples, or hidden metal
- Match RPM to the material being cut
- Let the blade do the work instead of forcing it
Store Blades Properly
Keep blades in a dry location. Wrap them in oiled paper or use blade protectors to prevent rust and edge damage during storage.
Know Your Blade Type
Not every blade can be sharpened:
- Carbide-tipped: Yes, with professional service
- High-speed steel (HSS): Sharpenable with files or bench grinders
- Diamond-coated: Not user-sharpenable, reserved for specialized industrial use
Frequently Asked Questions About Sharpening Saw Blades
Can I sharpen a carbide saw blade at home?
Yes, but only for minor touch-ups using diamond files or a Dremel with a proper jig. Full restoration requires professional equipment. For significant dullness or damage, professional sharpening delivers safer and more consistent results.
How many times can a carbide saw blade be sharpened?
Most carbide-tipped blades can be sharpened one to two times. Each sharpening removes a small amount of carbide, and after two rounds there is often not enough material left to maintain structural integrity.
How much does professional saw blade sharpening cost?
Professional sharpening typically runs $25 to $35 per blade. This is often cheaper than replacing a mid-range blade and far less than buying a premium replacement.
How do I know when to replace instead of sharpen?
Replace the blade if teeth are chipped or broken, if carbide material is worn thin, if gullets are too shallow to clear sawdust, or if rough cuts persist even after a thorough cleaning.
What is the best cleaner for saw blades?
A citrus-based degreaser like Simple Green works very well. Soak the blade for 10 to 15 minutes, scrub with a stiff brush, rinse, and dry completely before reinstalling.
Can I use a regular file on a carbide blade?
No. Standard files are softer than carbide and will wear down quickly without removing material from the tooth. Use diamond-coated files instead, or send the blade to a professional service.
Key Takeaways for Sharpening Your Saw Blade
So, how to sharpen a saw blade the right way? The honest answer is that most users should leave it to the professionals. Carbide’s extreme hardness and the precision required make professional service the only reliable method for true restoration.
DIY methods have a role, but only for minor touch-ups with the right tools and plenty of caution. For anything beyond light maintenance, invest in professional sharpening or a quality replacement blade.
Remember these core points:
- Clean the blade first, since many “dull” blades just need a scrub
- Sharpen premium blades once or twice at most
- Replace when teeth are damaged or gullets are shallow
- Never use a chisel or steel file on carbide
Treat your saw blades well, and you will enjoy cleaner cuts, longer tool life, and safer operation for years to come. When in doubt, replace or resharpen professionally. Your projects, and your fingers, will thank you.