You just unboxed your new Ryobi miter saw and want to start cutting with precision right away. Whether you are installing baseboards, building a deck, or crafting crown molding, learning how to operate Ryobi miter saw tools correctly is the key to clean, accurate results and safe operation. This guide breaks down setup, blade installation, safety rules, and cutting techniques based strictly on official specifications and best practices.
By the end, you will confidently make crosscuts, miters, bevels, and compound cuts like a pro. You will also keep your workspace safe and your tool in top condition for years of reliable use.
Safety First: Essential Precautions Before Operating a Ryobi Miter Saw
Before plugging in or inserting the battery, safety must come first. A Ryobi miter saw spins at high speed and can cause serious injury if misused.
Wear Proper Protective Gear
Always wear safety glasses to shield your eyes from flying debris. Hearing protection is also required because Ryobi miter saws generate noise levels that can damage hearing over time. Avoid loose clothing, gloves, or jewelry that could get caught in moving parts. Keep long hair tied back at all times.
Power Down for All Adjustments
Never change blades, clean dust, or adjust components while the tool is powered. For cordless models, remove the battery. For corded versions, unplug from the outlet. This prevents accidental startups, which are a leading cause of workshop injuries.
Maintain Correct Work Position
Place the saw on a stable, level surface at hip height. Never operate it while crouched or on uneven ground. Use a workbench or saw stand for support. Ensure the support foot is flat and the base does not wobble. If needed, secure the saw with bolts or clamps through the mounting holes in the base.
Hand Placement Rules
Keep both hands on the handle and switch. Never reach behind the blade during or after a cut. Maintain at least 4 inches of clearance between your hands and the blade path. For small offcuts, use a push stick or clamp to avoid hand contact near the spinning blade.
Assemble and Set Up Your Ryobi Miter Saw
Proper assembly ensures stability, accuracy, and long-term performance when learning how to operate Ryobi miter saw equipment.
Unbox and Inspect Components
Remove all plastic wraps and shipping straps, especially from the blade guard. Check that you have:
• Dust collection bag
• Blade wrench (dual-purpose Phillips and hex)
• Operator’s manual
Verify nothing is damaged during shipping before proceeding.
Install the Dust Collection Bag
Squeeze the side tabs on the bag and slide it onto the dust port at the rear of the saw. For better cleanup, connect a shop vacuum hose using an adapter. This captures up to 75% of sawdust compared to the bag alone. Empty the bag after each use to maintain suction.
Mount the Saw Securely
Use clamps or bolts to attach the saw to a sturdy workbench. This prevents movement during cutting, especially when making slide cuts. Ensure the surface is flat and will not vibrate under load.
Install or Replace the Blade Correctly
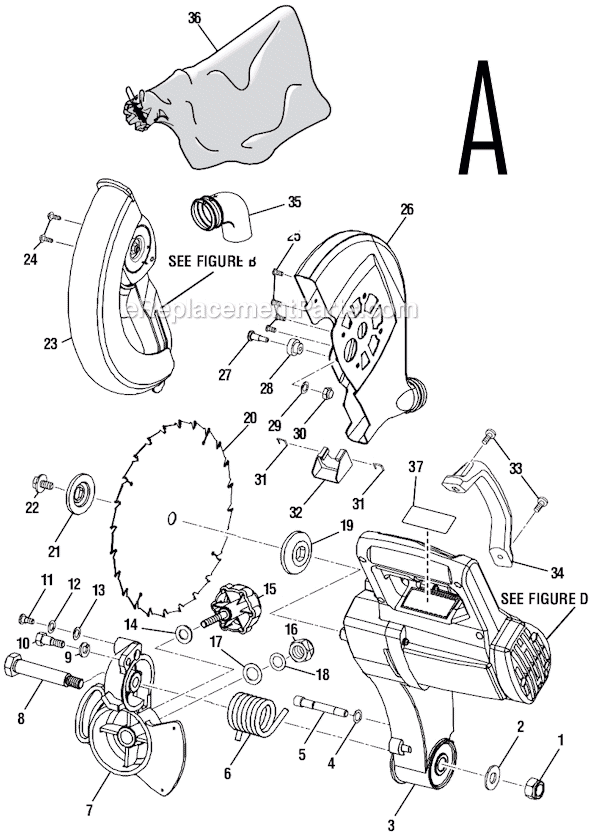
A sharp, properly installed blade is critical for clean cuts and safe operation.
Prepare for Blade Change
- Remove the power source (battery or cord).
- Raise the saw arm fully to access the blade.
- Loosen the blade bolt cover using the Phillips end of the wrench.
Access and Remove the Old Blade
Rotate the lower blade guard up to expose the arbor nut. Press and hold the spindle lock button to stop the blade from turning. Use the hex end of the wrench to loosen the arbor nut.
Critical Note: The nut is reverse-threaded, so turn clockwise to loosen.
Remove the nut, outer washer, and old blade. Do not remove the inner washer because it stays on the spindle.
Mount the New Blade
Slide the new blade onto the arbor with teeth pointing downward at the front. This ensures the teeth cut into the material as the blade spins clockwise. Align the “Double D” hole on the blade with the flats on the spindle.
Replace the outer washer (aligned properly), then the arbor nut. Hold the spindle lock and tighten the nut by turning counterclockwise. Reattach the blade bolt cover and tighten the screw. Test the blade guard by lowering and raising the arm to confirm it moves freely without catching.
Set Angles Accurately on Your Ryobi Miter Saw

Precision cuts start with accurate angle settings, which is a core part of knowing how to operate Ryobi miter saw tools professionally.
Adjust the Miter Angle
The miter controls the left-right angle across the face of the board.
- Loosen the miter lock knob.
- Press the detent release lever to unlock preset stops.
- Rotate the table to your desired angle.
- Tighten the miter lock securely.
Common detent stops include 0°, 15°, 22.5°, 30°, 31.6°, and 45°. Use the miter scale at the base for fine adjustments beyond these detents.
Set the Bevel Angle
The bevel tilts the blade through the thickness of the material.
- Loosen the bevel lock knob.
- Tilt the blade left or right to the desired angle (up to 45°).
- Tighten the lock securely.
Check alignment with a reliable square, especially at 0° and 45° settings.
Lock the Sliding Mechanism When Needed
If you are not cutting wide boards, tighten the slide lock knob to prevent unintended movement. This improves stability for precise miter or bevel cuts, especially on crown molding work.
Use the Laser or LED Guide Correctly

Ryobi offers two alignment aids depending on your model. Knowing how to use them improves accuracy.
Activate the Laser (If Equipped)
Some models use two AAA batteries housed in a side compartment. Insert the batteries, close the lid (do not overtighten the screw), and flip the laser switch.
Important: The laser only activates when the saw handle is locked down on some models.
Understand Laser Offset
The blade cuts just to the left of the laser line. Always align your cut mark to the right edge of the laser beam for accuracy. Test on scrap wood and adjust your mental reference accordingly.
Use the LED Shadow Line (HP Brushless Models)
Instead of a laser, some models project a shadow of the blade onto the workpiece. This works better in bright light and does not require batteries. Align the shadow edge with your pencil mark for precise cuts.
Make Different Types of Cuts with Confidence
Now you are ready to cut. Follow this sequence for every type of cut on your Ryobi miter saw.
Perform a Crosscut (90° Straight Cut)
Ideal for trimming boards to length.
- Set miter and bevel to 0°.
- Lock the slide mechanism if applicable.
- Place board flat on table, flush against the fence.
- Clamp the workpiece securely.
- Align the blade with your cut mark.
- Insert battery or plug in the tool.
- Press the lockout, squeeze the trigger, and wait for full speed.
- Lower the blade smoothly into the wood.
- Let it cut through completely.
- Release the trigger, wait for the blade to stop, then raise.
Cut a Miter (Angled Face Cut)
Used for picture frames or corner joints.
- Set the miter angle (commonly 45°).
- Keep the bevel at 0°.
- Clamp the workpiece firmly because angled cuts can shift.
- Align the blade with your mark.
- Cut as in the crosscut steps.
For matching pairs like frame corners, flip the board end-for-end after the first cut.
Make a Bevel Cut (Tilted Thickness Cut)
Used for roof angles or chamfers.
- Set the bevel angle (for example, 30° left).
- Keep the miter at 0°.
- Lay the board flat on the table.
- Clamp securely.
- Cut as usual. The blade enters at an angle through the thickness.
Execute a Compound Cut (Miter + Bevel)
Common for crown molding installed flat.
- Set both miter (for example, 33.9°) and bevel (for example, 31.6°).
- Double-check both locks are tight.
- Use test scrap to confirm fit before cutting the final piece.
- Follow the standard cutting procedure.
Use the Slide Function for Wide Boards
Extends cutting capacity up to 13 inches wide.
- Unlock the slide lock knob.
- Position the arm fully forward over the front edge of the board.
- Start the blade and reach full speed.
- Lower the blade into the front edge of the material.
- Push the handle away from you in a smooth motion toward the fence.
- Complete the cut and release the trigger.
- Wait for the blade to stop, then return the arm to the rear.
Never pull the saw toward you during a slide cut because this causes binding and kickback.
Maintain and Store Your Ryobi Miter Saw Properly
Good maintenance keeps your saw accurate and safe for years of reliable service.
Clean After Every Use
Wipe sawdust from the table, fence, and miter scale. Clean the blade guard pivot to ensure smooth retraction. Empty the dust bag or vacuum hose regularly to prevent buildup.
Inspect and Replace Blades
Check for dullness, chipped teeth, or warping. Use:
• 24 to 40 teeth for framing and rough cuts
• 60 to 80 teeth for smooth finish work
Replace blades when cuts require excessive pressure or show burn marks on the wood.
Lubricate Moving Parts
Apply light machine oil to slide bars and pivot points as recommended in the manual. This prevents rust and ensures smooth operation over time.
Store Safely
- Lower the blade fully onto the table.
- Engage the storage lock pin by pressing the handle down, pulling the lever, and rotating it.
- Store in a dry place to prevent rust.
- Consider using a padlock through the switch or lock pin to prevent unauthorized use.
Troubleshoot Common Ryobi Miter Saw Issues
Fix problems fast with these proven solutions.
Why Are My Cuts Inaccurate?
Check if the miter or bevel locks are loose. Clean detent stops because dust can prevent proper seating. Verify clamping because material shifting causes errors. Test 0° settings with a square and adjust stop screws if needed.
Why Is the Wood Burning?
A dull blade or slow feed rate causes friction and burn marks. Sharpen or replace the blade. Let the saw do the work without forcing it through the material.
Why Is There Tear-Out on the Surface?
Switch to a higher tooth-count blade (60 to 80 teeth). Apply masking tape over the cut line before cutting to reduce splintering on finished surfaces.
Why Won’t the Laser Turn On?
Check the AAA batteries if applicable. Ensure the saw handle is locked down because some models require this. Verify the laser switch is on. Adjust or compensate for the offset because the blade cuts left of the line.
Pro Tips for Better Cutting Results

Elevate your craftsmanship with these expert techniques.
Always Test on Scrap Wood
Before cutting final pieces, make a test cut to verify angle, depth, and alignment. This saves material and prevents costly mistakes on expensive lumber.
Practice Compound Cuts First
Crown molding requires precise compound angles. Practice on scrap to master the hand motion and ensure tight joints at every corner.
Use Depth Control for Dados
Turn the depth control knob to limit blade travel. This lets you cut shallow grooves without slicing all the way through the material.
Adjust the Fence for Tall Molding
On sliding models, loosen the side screw to raise or rotate the miter fence. Position it to support tall crown molding without interfering with the blade path.
Choose the Right Blade for the Job
Match the blade to your project:
• Framing lumber? Use a 24 to 40 tooth blade for speed
• Trim or molding? Use a 60 to 80 tooth blade for clean edges
Frequently Asked Questions About Operating a Ryobi Miter Saw
What Size Blade Does a Ryobi Miter Saw Use?
Ryobi miter saws typically use blades in 7.25 inch, 10 inch, or 12 inch diameters. The blade size must match your specific saw model for safe and accurate operation. Larger blades allow deeper and wider cuts in thicker materials.
How Wide Can a Ryobi Sliding Miter Saw Cut?
Sliding Ryobi miter saws can cut boards up to 13 inches wide in a single pass. Non-sliding models typically cut through approximately 4.5 inches of material width. The slide bars extend the blade forward to handle wider boards without repositioning.
Which Way Do the Teeth Point on a Ryobi Miter Saw Blade?
The teeth must point downward at the front of the saw. This orientation allows the teeth to cut into the material as the blade spins clockwise. Installing the blade backward will cause poor cuts and potential safety hazards.
Is the Ryobi Miter Saw Arbor Nut Reverse Threaded?
Yes, the arbor nut is reverse-threaded. You turn it clockwise to loosen and counterclockwise to tighten. This design prevents the blade from loosening during operation. Always confirm thread direction before applying force.
How Do I Turn On the Laser on My Ryobi Miter Saw?
Insert two AAA batteries into the side compartment on models with a battery-powered laser. Lock the saw handle in the down position because some models only activate the laser when locked. Flip the laser switch and align your cut mark to the right edge of the beam.
What Blade Tooth Count Should I Use for Trim Work?
Use a blade with 60 to 80 teeth for trim, crown molding, and finish work. Higher tooth counts produce smoother edges with minimal tear-out. Use 24 to 40 tooth blades only for framing and rough construction cuts.
Key Takeaways for Operating Your Ryobi Miter Saw Safely
Operating a Ryobi miter saw safely and effectively comes down to three core principles: preparation, precision, and practice. Always wear proper protective gear, disconnect power before adjustments, and verify your angle settings with test cuts on scrap wood.
Keep your blade sharp and matched to the job, and never rush a cut. Understanding how to operate Ryobi miter saw tools correctly transforms intimidating equipment into a reliable workshop companion. Start with simple crosscuts, progress to miters and bevels, and practice compound angles before tackling crown molding.
Your next step: Set up your saw today using the assembly steps above, install the correct blade for your most common project, and make your first test cut on scrap wood to build confidence before moving to final pieces.