A seized arbor on your hole saw can stop a project cold. Whether rust, packed sawdust, or years of use has locked the threads, trying to pry it loose with pliers or a hammer often damages the tool or your hands. The fastest and safest solution involves an impact driver paired with the correct socket size. This guide walks you through how to remove arbor from hole saw units, covering the right tools, techniques for different arbor designs, and maintenance tips to prevent future seizing.
You’ll learn a proven method that works on standard hex-drive models and quick-release snap-lock designs alike. No more stripped threads, bent prongs, or wasted time wrestling with stuck components. Let’s get that arbor free.
Secure the Hole Saw Before Removal
Stability is critical when applying rotational force to a stuck arbor. A spinning saw body absorbs energy and reduces effectiveness.
Clamp It in a Vise
Always secure the hole saw in a bench vise before attempting removal. Position the jaws to grip the outer rim and avoid compressing the cutting teeth, which can distort the blade. If a vise isn’t available, wear heavy-duty work gloves and grip the saw firmly, keeping fingers clear of the arbor area.
Why Stability Matters
A loose hole saw body absorbs impact energy instead of transferring it to the seized threads. Clamping ensures all force goes directly into breaking the connection. This is especially important for older, rusted units that need maximum torque to release.
Apply Penetrating Oil for Stubborn Cases
Corrosion and debris are the main culprits behind seized arbors. A little prep goes a long way.
When Lubricant Helps
If the arbor hasn’t been removed in months or shows visible rust, apply penetrating oil where the arbor meets the saw body. Products like PB Blaster or WD-40 Specialist work well for this task. Let it soak for 5 to 15 minutes to break down rust and debris packed into the threads.
Pro Tip: Reapply if Needed
If the first impact attempt fails, reapply oil and wait longer, up to 30 minutes. This gives the solvent time to creep into tight spaces and loosen stubborn bonds. Patience here saves time later.
Choose the Correct Socket Size
Using the wrong socket is the most common reason for failed removal attempts. Match the socket to your arbor type exactly.
9mm Socket for Standard Hex Arbors
Most general-purpose hole saws use a 9mm hex drive, including Lennox-style models. Confirm by checking the arbor head before selecting your socket. Some variations may use 1/4-inch or 3/8-inch hex drives, so match accordingly.
11/16″ Socket for Diablo Quick-Release
Diablo and similar snap-lock arbors require an 11/16-inch socket. This size fits over the release collar and activates the internal mechanism when rotated in reverse.
Protect Your Premium Sockets
Keep a cheap, dedicated socket set in your tool bag for this task. Impact forces and job-site debris can damage high-end sockets. Don’t risk your good set on this routine maintenance job.
Use an Impact Driver for Maximum Effect
This is the core of the method. No hammers, pliers, or screwdrivers needed.
Why Impact Beats Standard Drills
A regular drill lacks the torque to break seized threads. An impact driver delivers rapid rotational hammer blows that vibrate corrosion loose. It’s specifically designed for high-resistance fasteners and works instantly where other tools fail.
Set to Reverse Mode
Attach the correct socket to your impact driver. Set the tool to reverse (counterclockwise). Place the socket firmly over the arbor drive and pull the trigger.
⚠️ Warning: Keep your free hand clear. The arbor can pop off suddenly once the threads break free.
Remove Standard Hex-Drive Arbors

Follow these steps for common 9mm hex-drive models found in most hardware store kits.
Step-by-Step Removal
- Clamp the hole saw in a vise.
- Apply penetrating oil if corrosion is present.
- Fit the 9mm socket snugly over the hex head.
- Tap lightly with a mallet if the socket feels loose.
- Attach the impact driver and run in reverse.
- The arbor should release within seconds.
Fix a Loose Socket Fit
If the socket wobbles, it can round the hex corners and ruin the arbor. Tap it gently with a hammer to expand the socket’s inner edge for a tighter grip before using the impact driver.
Remove Diablo Snap-Lock Arbors

These quick-release models use a collar mechanism that disengages under reverse torque.
How the Mechanism Works
The 11/16″ socket presses down on the release collar while rotating. This action unlocks the internal snap ring, freeing the arbor instantly without extra effort from you.
Removal Steps
- Secure the hole saw in a vise.
- Slide the 11/16″ socket over the collar.
- Connect to the impact driver set to reverse.
- Activate and the arbor releases with a pop.
✅ Pro Tip: No need to press down manually. The socket does it automatically under load.
Handle Bolt-Fastened Arbor Assemblies
Some models use screws or bolts instead of simple threaded connections.
Loosen the Retaining Fastener
- Hex Bolt Models: Use an Allen key to loosen the side bolt. Don’t remove it fully; just enough to release tension.
- Flat-Head Screws: Use a flathead screwdriver to back out the screw.
Slide Off the Sleeve
Once loosened, slide the outer sleeve down the arbor shaft. If stuck, tap gently with a soft mallet. Avoid prying, which can bend the prongs.
Then Remove the Arbor
After removing the sleeve, the arbor can often be unscrewed by hand or with pliers. For seized units, use the socket-and-impact method on the hex base if accessible.
Prevent Future Seizing
Avoid repeat problems with simple maintenance habits.
Clean Threads After Every Use
Wipe the arbor and hole saw threads after each job. Remove sawdust, metal shavings, and moisture. These contaminants cause corrosion and binding over time.
Apply Anti-Seize Lubricant
Before reassembly, coat threads with a light oil or anti-seize compound. This prevents rust and makes future removal effortless.
Store Components Properly
Keep hole saws dry. If possible, store arbors separate from blades to avoid moisture traps between mating surfaces.
Reassemble Your Hole Saw Correctly
Proper setup ensures safety and accurate cuts on your next project.
Align Prongs and Slots
Slide the hole saw onto the arbor, matching the prong holes with the arbor’s alignment slots. Ensure full seating before tightening any fasteners.
Set Pilot Bit Depth
The center drill bit must extend 1/8 inch past the cutting teeth. This ensures it centers the saw and prevents binding during operation.
Tighten the Fastener
Secure the sleeve with the hex bolt or screw. Check that it’s snug. Loose fittings cause wobble and inaccurate holes.
Test Spin by Hand
Rotate the assembly. It should turn smoothly without wobble. If it binds, disassemble and check alignment.
Perform a Safety Check Before Use
Before returning the tool to service:
- Confirm all fasteners are tight.
- Verify pilot bit protrusion is correct.
- Test on scrap material to check for vibration, wandering, or unusual noise.
✅ Final Check: If it cuts cleanly and stays centered, you’re ready for the job.
Troubleshoot Stubborn Arbors
If the arbor doesn’t release on the first try, don’t force it.
Socket Slipping? Tap It On
A loose socket won’t transfer torque effectively. Gently tap it with a hammer to seat it fully. This creates metal-to-metal contact and prevents rounding the hex corners.
Still Seized? Reapply Penetrating Oil
Soak the joint again and wait 10 to 15 minutes. Reattempt with the impact driver. Most stubborn cases yield after a second application.
Extreme Cases: Light Heating (Use Caution)
As a last resort, apply gentle heat to the outer sleeve with a heat gun. Do not use a torch; excessive heat ruins the steel’s temper. Heating expands the sleeve slightly, breaking the bond. Let it cool slightly, then try the impact method again.
Why This Method Beats Traditional Techniques
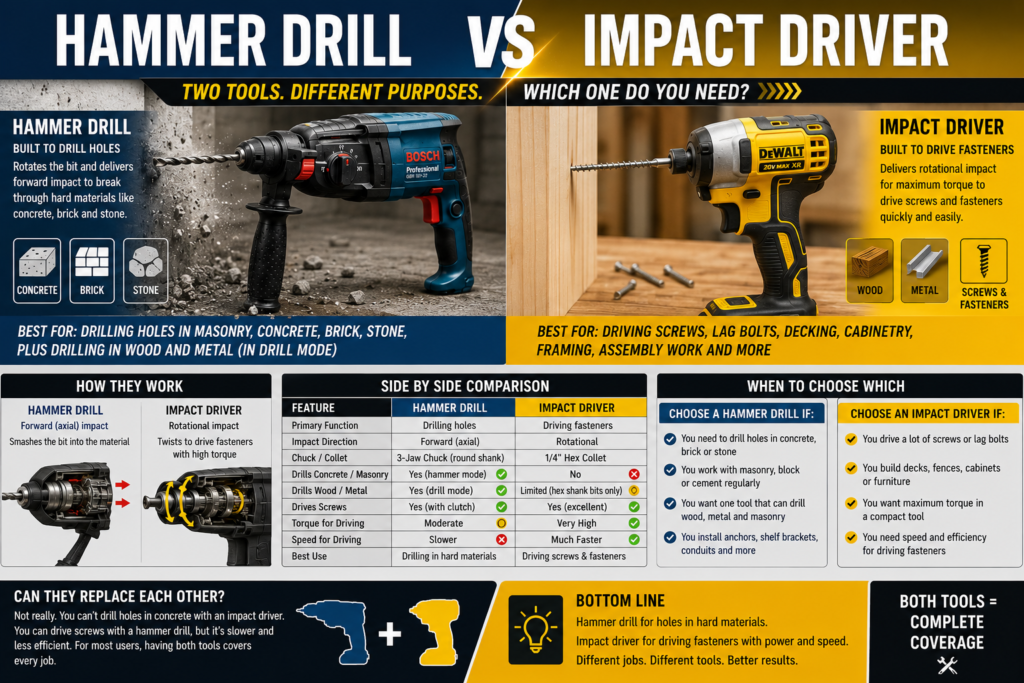
Compared to outdated approaches, the impact driver method is faster, safer, and more reliable.
No More Damaged Tools
- Hammers and screwdrivers often slip, damaging arbor heads or user hands.
- Pliers and vice grips crush hex shapes and fail under high resistance.
- Manual wrenches lack the burst torque needed for seized parts.
Works on Long-Term Seized Units
Field tests show success even on arbors stuck for over 18 months in dusty, humid conditions. The percussive action clears debris dynamically during removal.
Compatible With All Major Brands
Whether it’s Lennox, Diablo, Milwaukee, or DeWalt, the socket-and-impact method works. Just match the socket size to your specific arbor type.
Frequently Asked Questions About Removing Arbors from Hole Saws
What size socket do I need to remove a hole saw arbor?
Use a 9mm socket for standard hex-drive arbors found in most general-purpose hole saws. For Diablo quick-release or snap-lock models, use an 11/16-inch socket. Always confirm your arbor type before selecting a socket.
Can I remove a stuck arbor without an impact driver?
An impact driver is the most reliable method, but a standard drill may work on lightly seized arbors. For heavily corroded or long-stuck units, the percussive force of an impact driver is necessary to break the threads free.
Will penetrating oil damage my hole saw?
No, penetrating oil is safe for hole saws and arbors. Products like PB Blaster or WD-40 Specialist help break down rust and debris. Just clean the threads thoroughly after removal and before reassembly.
How do I prevent my arbor from seizing in the future?
Clean threads after each use, apply a light coat of oil or anti-seize compound before reassembly, and store hole saws dry. Separating arbors from blades during storage prevents moisture accumulation between mating surfaces.
Is it safe to heat a stuck arbor to remove it?
Light heating with a heat gun can help in extreme cases by expanding the outer sleeve. Never use a torch, as excessive heat ruins the steel’s temper and weakens the tool. This method should be a last resort.
What if my hole saw doesn’t have side pins?
Hole saws without side pins rely entirely on thread friction and are more prone to seizing. The impact driver method is the only reliable non-destructive option for these models, since prying can easily bend the thin metal tabs.
Key Takeaways for Removing a Stuck Hole Saw Arbor
Learning how to remove arbor from hole saw units saves time, money, and frustration. The combination of an impact driver and the correct socket (9mm for standard, 11/16″ for Diablo) is the definitive solution for seized connections. This method works in seconds where hammers and pliers fail, and it protects both your tools and your hands.
Start by securing the hole saw in a vise and applying penetrating oil if corrosion is present. Match your socket to the arbor type, attach your impact driver in reverse mode, and let the percussive force do the work. After removal, clean all threads, apply anti-seize compound, and reassemble with the pilot bit extending 1/8 inch past the cutting teeth.
Grab your impact driver and the right socket, then put this method to work on your stuck hole saw today.