Cutting crown molding with a hand saw is a skill that delivers a professional finish without expensive power tools. Many DIYers believe this task demands a miter saw or complex setup, but the truth is that sharp tools, accurate marks, and steady hands produce tight, seamless corners by hand. Whether you’re on a tight budget, working in a space without electricity, or simply prefer the tactile control of manual cutting, learning how to cut crown molding with a hand saw gives you full creative freedom. In this guide, you’ll discover the exact steps to measure, mark, brace, and cut crown molding accurately using only basic tools.
Essential Tools and Materials for Hand-Sawing Crown Molding
-1024x768_0.jpg)
Before making your first cut, gather the right equipment. Using proper tools ensures accuracy and reduces frustration during the project.
Choose the Right Hand Saw
For crown molding, use a fine-tooth backsaw or dovetetail saw with at least 10 to 15 teeth per inch. These saws offer precision and clean cuts in wood trim. A miter box can also help maintain consistent angles when cutting by hand.
- Backsaw: Rigid spine keeps the blade straight for accurate 45° miter cuts
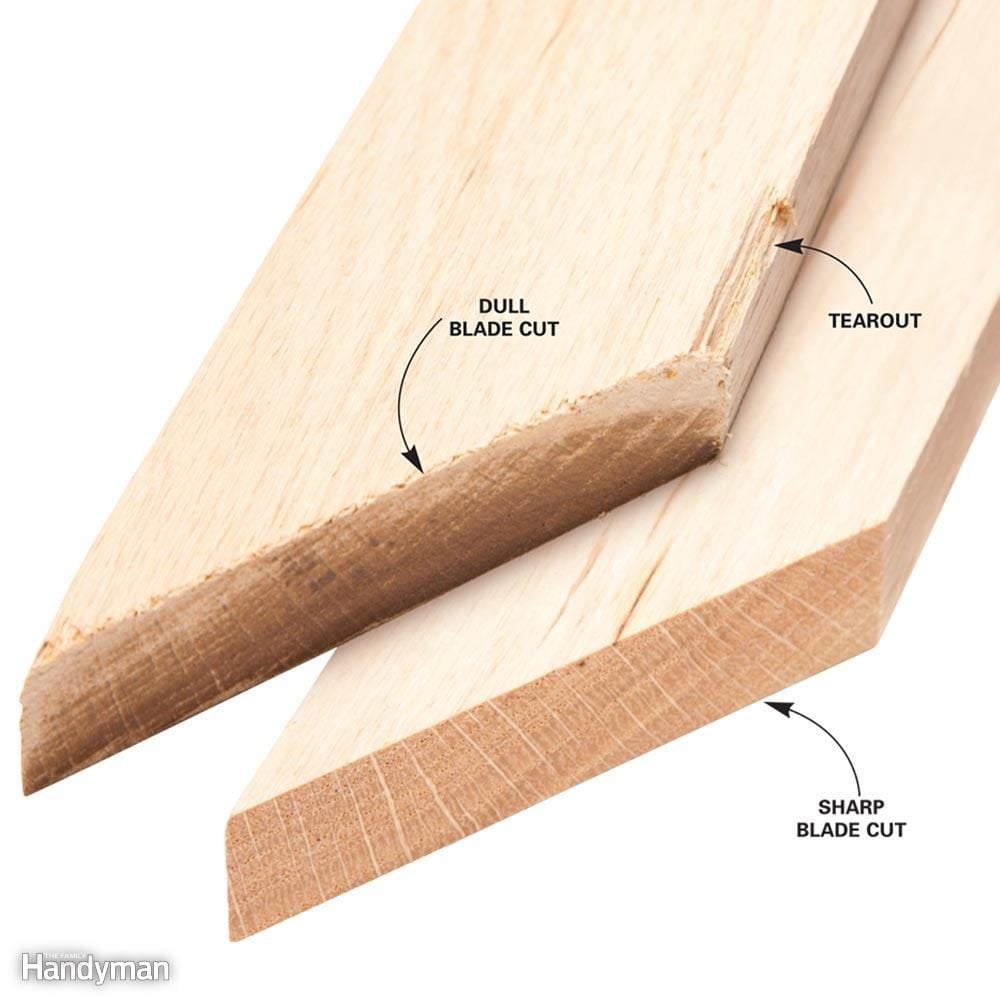
- Sharpness matters: Dull blades tear wood fibers, causing splinters
- Crosscut vs rip-cut teeth: Use crosscut blades for cleaner finishes across the grain
Additional Supplies You’ll Need
Gather these supporting items before starting:
- Miter box (optional but helpful for beginners)
- Tape measure
- Pencil for marking
- Carpenter’s square or speed square
- Clamps or workbench
- Sandpaper (120 to 220 grit)
- Wood filler for touch-ups
Measuring and Marking Crown Molding Accurately
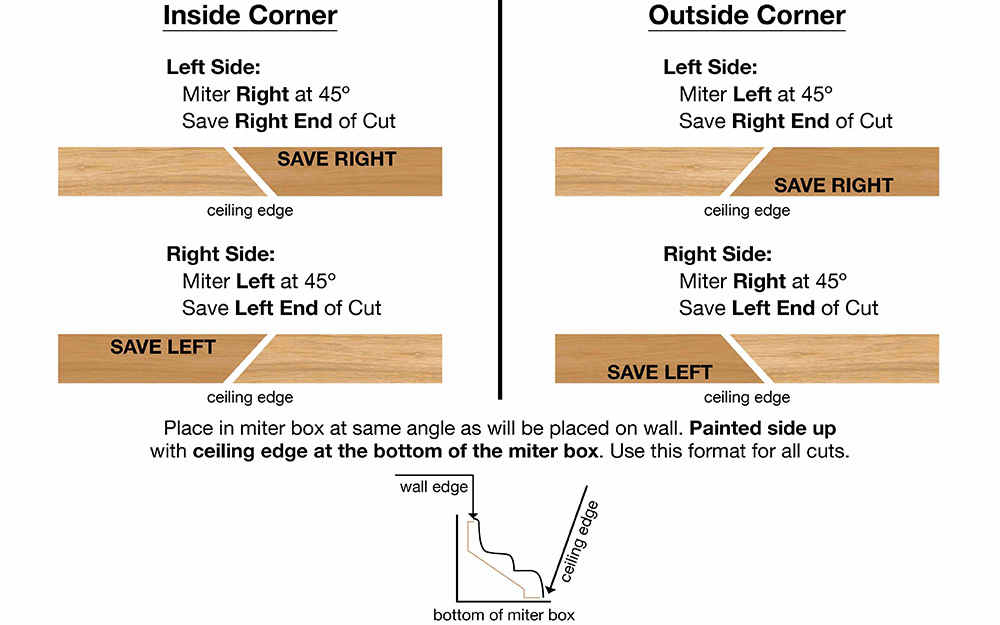
Precision starts before the saw touches the wood. Incorrect measurements lead to gaps, especially in inside and outside corners.
Measure Twice, Cut Once
Start by measuring the wall length where the molding will go. Always cut slightly long and test-fit before final installation, since wood varies and walls are rarely perfectly square.
- Record measurements clearly
- Label each piece (left or right) to avoid confusion
- Account for overlapping joints in inside corners
Transfer Miter Angles Correctly
Crown molding sits at an angle between wall and ceiling, so miters must be cut precisely.
Inside Corner: 45° Miter Cut
- Mark the back of the molding (the part that touches the wall)
- Use a combination square to draw a 45° line across the face
- Ensure the angle leans the right way, with the top leaning inward
Outside Corner: Reverse 45° Miter
- Mirror the inside cut direction
- Double-check orientation before cutting
- Consider coping instead of mitering for a better fit
Pro Tip: Hold the molding in position (upside down and against the wall) when marking angles to simulate its installed position.
Secure the Molding for Cutting
Stability is key when using a hand saw. A wobbly workpiece leads to crooked cuts and wasted material.
Use a Workbench or Sawhorse
Clamp the molding firmly to prevent vibration. Never hold it with your hand while sawing.
- Place the cut line just beyond the edge of the table
- Support both ends to avoid sagging during the stroke
Position for Natural Sawing Motion
Align the piece so your dominant hand can move freely. Your body should be square to the cut line.
- Stand comfortably with feet shoulder-width apart
- Keep eyes directly above the blade for better alignment
- Let the saw do the work without forcing it
Making the Cut by Hand
Now comes the actual cut. This step demands focus, but with practice, it becomes second nature.
Start the Cut with Control
Place the saw on the waste side of the line. Use short, light strokes to create a groove before full strokes.
- Rest your non-dominant hand lightly on the wood for stability
- Begin at a low angle, then bring the saw flat to the miter
- Maintain consistent rhythm at 60 to 80 strokes per minute
Follow the Line Smoothly
Once the kerf is established, use full strokes along the entire blade length.
- Keep wrist straight and pivot from the elbow
- Look at the line, not the blade
- Let gravity assist with minimal downward pressure
Warning: Pushing too hard causes binding and rough edges. Let the teeth do the cutting.
Finish Cleanly
As you approach the end of the cut, slow down and support the offcut to prevent tear-out.
- Flip and cut from the back if splintering is a concern
- Lightly sand the edge with fine-grit paper
- Test fit before nailing into place
Achieving Tight Miter Joints
A clean cut doesn’t guarantee a seamless joint. Fit matters just as much as the cut itself.
Check for Gaps in Corners
Dry-fit both pieces before installation. Hold them in place and inspect the seam.
- If there’s a gap at the front (outside), the angle is too shallow
- Gap at the back means the angle is too steep
- Adjust by recutting or sanding slightly
Use Coping for Inside Corners (Optional)
Instead of two miters, many carpenters prefer coping. Cut one piece square and the other with a profiled edge.
- Coping creates a tighter seal on uneven walls
- Requires a coping saw and steady hand
- Best for softwoods like pine
Common Mistakes to Avoid When Cutting Crown Molding by Hand
Even experienced DIYers make errors when cutting crown molding without power tools.
Cutting the Wrong Angle Direction
One of the most frequent issues is flipping the miter direction. Always double-check your orientation.
- Inside left corner requires a right-hand miter
- Inside right corner requires a left-hand miter
Ignoring Spring Angle
Crown molding isn’t flat. It has a spring angle, typically 38° or 45°. When cutting flat, simulate its installed position.
The “Nested” Method Trick
Lay the molding upside down, nestled between two blocks that mimic wall and ceiling.
- Bottom edge rests on a 90° support
- Cut at 45° across the face
- Matches real-world angle when installed
This method ensures correct bevel and miter even without a power saw.
Rushing the Process
Hand sawing takes longer than power tools. Don’t sacrifice accuracy for speed.
- Pause and recheck alignment if the blade drifts
- Take breaks to avoid fatigue-related mistakes
- Sand minor imperfections instead of recutting
Practice on Scrap Wood First
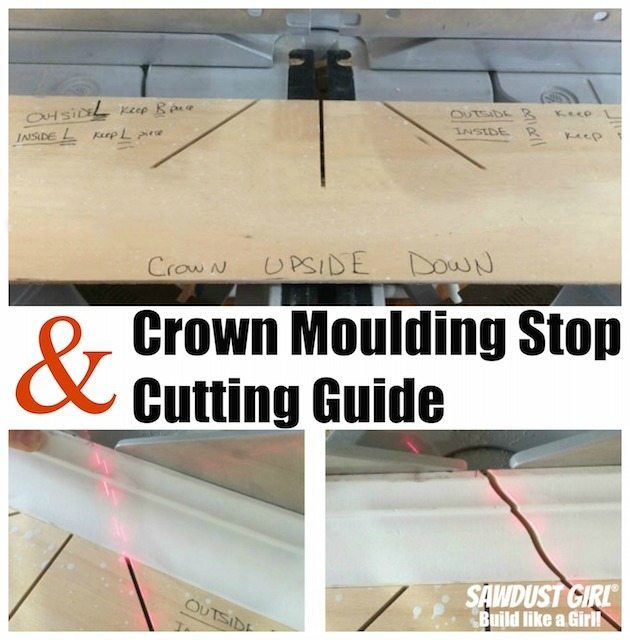
Before cutting your final pieces, run a test on scrap wood of similar thickness.
Why Practice Matters
- Builds muscle memory for smooth strokes
- Tests your marking accuracy
- Reveals saw performance, including sharpness and tracking
Use this time to refine technique. Try different grips, speeds, and clamping setups until you find what works best.
Final Fit and Installation Tips for Hand-Cut Crown Molding

Once all pieces are cut, it’s time to install and finish your work.
Dry-Fit All Sections
Assemble the molding on the floor or in place without nails.
- Check corner alignment
- Mark any adjustments directly on the wood
- Number each section for easy reassembly
Nail and Fill
Use a brad nailer or small finish nails to secure the molding.
- Drive nails at slight angles into studs or joists
- Countersink slightly and fill holes with matching wood putty
- Sand lightly after drying
Touch Up Seams
For near-perfect joints:
- Apply caulk along inside corners
- Smooth with a wet finger
- Paint after drying for invisible seams
Frequently Asked Questions About Cutting Crown Molding with a Hand Saw
What type of hand saw works best for crown molding?
A fine-tooth backsaw or dovetetail saw with 10 to 15 teeth per inch works best. These saws provide the precision needed for clean miter cuts in trim work.
Can I cut crown molding without a miter box?
Yes, you can cut crown molding without a miter box by using the nested method. Lay the molding upside down between two blocks that simulate wall and ceiling angles, then cut at 45° across the face.
What is the spring angle on crown molding?
The spring angle is the angle at which crown molding sits between the wall and ceiling. Standard spring angles are typically 38° or 45°, depending on the molding profile.
Should I cope or miter inside corners?
Coping produces tighter joints on uneven walls and is preferred by many carpenters. Mitering is faster but requires perfect wall angles to look seamless.
How do I prevent splintering when cutting by hand?
Use a sharp blade, cut on the waste side of the line, and support the offcut to prevent tear-out. Sanding the finished edge with fine-grit paper also smooths minor splinters.
How long does it take to cut crown molding with a hand saw?
Hand sawing takes longer than using power tools, typically several minutes per cut for beginners. With practice, you can speed up without sacrificing accuracy.
Key Takeaways for Cutting Crown Molding with a Hand Saw
Cutting crown molding with a hand saw is entirely achievable with attention to detail and the right technique. While slower than power tools, hand cutting offers unmatched portability and control, making it perfect for small jobs or tight spaces. Focus on accurate measurements, secure your work properly, and cut with patience to achieve results that look professionally installed. Start by practicing on scrap wood to build confidence, then move on to your final pieces. With these skills, your hand-cut crown molding will add elegance to any room, proving that great craftsmanship doesn’t require expensive gear.