Felling a tree with a chainsaw is a common task for landowners, but it carries serious risks if done incorrectly. Every year, thousands of people suffer chainsaw injuries during routine cuts, not emergencies. This guide covers the proper method for cutting down a tree with a saw, based on professional forestry standards and OSHA safety regulations.
Whether you are clearing dead wood, harvesting firewood, or opening up a view, the right technique protects you and your property. You will learn how to gear up, plan your cuts, execute the felling sequence, and process the tree afterward. Follow these steps to bring down a tree safely and with confidence.
Wear Proper Safety Gear Before Starting
Personal protective equipment is your first defense against chainsaw injuries. OSHA regulation 1910.266 requires professional operators to wear specific gear, and home users should follow the same standards. A chainsaw chain moves at speeds exceeding 6,000 RPM, so even brief contact can cause severe lacerations.
Essential Protective Equipment
The following items form the core of chainsaw PPE:
- Hard hat with face shield: Protects against falling debris and flying wood chips. Many models include built-in ear protection.
- Hearing protection: Chainsaws produce over 100 decibels, which can cause permanent hearing loss. Use earmuffs or approved earplugs.
- Chainsaw chaps or pants: Made with layered fibers that clog the chain upon contact, reducing injury severity.
- Steel-toed boots: Provide ankle support and cut resistance. Use steel toes in summer and fiberglass toes in winter.
- Cut-resistant gloves: Improve grip and protect hands during operation. Leather gloves work well in most conditions.
Wear sturdy, long-sleeved clothing that fits close to the body. Loose fabric can catch in brush or the moving chain.
Check the Chain Brake Function
The chain brake sits just in front of the top handle. It stops the chain instantly during kickback, which happens when the upper bar tip contacts a solid object. Test the brake before every use and confirm it engages when you push the front handle forward. A malfunctioning chain brake requires professional repair before operating the saw.
Prepare the Chainsaw and Tools
A well-maintained saw cuts smoothly and predictably. Field preparation takes only a few minutes but prevents mid-job breakdowns and dangerous malfunctions.
Pre-Start Chainsaw Checks
Run through this checklist before each project:
- Fuel mix: Combine fresh gasoline with 2-cycle oil in the ratio specified by your manual. Old fuel causes hard starting and poor performance.
- Bar oil: Refill the reservoir every time you add fuel. Proper lubrication prevents bar overheating and premature chain wear.
- Chain tension: The chain should sit snug against the bar but rotate freely by hand. A loose chain derails easily.
- Air filter: Clean it to maintain proper engine airflow.
- Chain sharpness: Sharpen after every 2 to 3 trees. A dull chain forces extra pressure and increases kickback risk.
Carry a scrench (combination wrench and screwdriver) for field adjustments. Pack a spare spark plug and a sharpened replacement chain for longer jobs.
Additional Tools for Tree Felling
Beyond the saw itself, gather these items:
- Plastic felling wedges: Prevent the tree from pinching the bar during the final cut.
- Ax or hatchet: Drives wedges into the cut.
- Tape measure: Ensures accurate log lengths.
- First-aid kit: Include finger bandages, eye wash, and burn cream.
- Charged cell phone: Essential for emergencies, especially when working alone.
Store everything in a dry toolbox. Forgetting a wedge or screwdriver miles from home can derail your entire job.
Assess the Tree and Surroundings
Successful felling depends on predicting how the tree will fall. Walk around the tree and look up before making any cuts. One overlooked hazard can turn a controlled job into a disaster.
Identify Potential Hazards
Scan the area for these dangers:
- Dead branches: Known as “widowmakers,” these can fall without warning.
- Natural lean: Determine which direction the tree already tilts.
- Nearby structures: Houses, sheds, power lines, and vehicles.
- Other people: Keep bystanders at least twice the tree’s height away.
- Wind conditions: Never fell trees during strong or gusty winds. Wind overrides cut control.
If the tree stands near power lines, stop and call a professional utility crew. Do not attempt to cut it yourself.
Choose the Right Tree to Fell
Beginners should start with small, healthy trees under 12 inches in diameter on flat ground. Look for trees that:
- Lean slightly toward an open clearing.
- Show no signs of rot or hollow sections at the base.
- Have minimal entanglement with neighboring trees.
Recheck the lean from multiple angles before committing. A tree that appears straight may actually tilt in a dangerous direction.
Clear the Work Area and Plan Escape Routes
A clean worksite prevents trips and falls while allowing quick retreat when the tree begins to topple.
Remove Obstacles Around the Stump
Cut away brush, vines, small saplings, and fallen logs within a 10-foot radius. Clear snow or debris so you can see the ground clearly. Blind cuts into hidden objects cause kickback. Pile cut material away from your planned movement path.
Create Two Escape Routes
Cut two paths at 45-degree angles from the back of the stump, leading away from the expected fall zone. Each path should extend at least 10 feet and remain free of tripping hazards. Use these routes only when the tree starts to fall. Never retreat directly behind a tipping tree, since debris can fly backward toward you.
Make the Face Cut Correctly
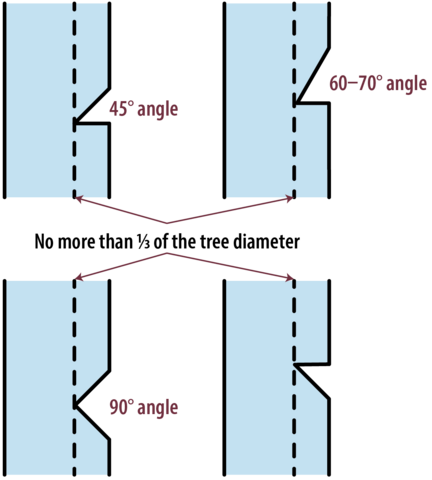
The face cut controls the direction the tree falls. Done properly, it guides the tree safely into the open area. Done incorrectly, it causes splitting, kickback, or a backward fall.
First Cut: Horizontal Face Cut
On the side facing the desired fall direction, make a horizontal cut into the trunk. Cut no deeper than 20 to 30 percent of the tree’s diameter. Position the cut at waist to chest height for maximum control.
Second Cut: Angled Bottom Cut
Start above the first cut and angle downward at least 45 degrees. Meet the first cut exactly to form a clean wedge. Remove the wedge of wood carefully.
The finished face should form a V-shape with a flat bottom. This flat edge determines the hinge thickness and fall direction.
Pro Tip: Never cut more than halfway through with the face cut. Overcutting weakens the hinge and risks a “barber chair,” where the trunk splits vertically and snaps back toward the operator.
Execute the Felling Cut with Wedges
The felling cut allows the tree to fall in the intended direction. It is made on the opposite side of the face and requires careful control.
Position the Felling Cut
Start the cut 1 inch above the tip of the face cut. Cut horizontally without angling up or down. Stop cutting when you reach a 1-inch hinge of uncut wood on the backside.
This hinge acts like a door hinge, guiding the tree’s fall. The hinge should be equal in thickness on both sides for a straight drop.
Use Felling Wedges for Large Trees
For trees over 10 inches in diameter, begin the felling cut and insert a plastic felling wedge. Tap it in with an ax. Continue cutting and add more wedges as needed.
Wedges prevent the tree from settling back and pinching the bar. They also help steer stubborn trees that resist falling.
Expert Note: If the tree begins to lean back, stop cutting and drive in another wedge. Never force the saw through pinched wood.
What to Do When the Tree Starts to Fall
Shout “Timber” loudly to warn anyone nearby. Immediately pull the saw out, shut off the engine, and step back along your escape route. Keep your eyes on the treetop, since branches can break and fall even after the trunk lands.
Never attempt a last-minute correction. Once the hinge breaks, the tree is committed to its fall path.
Process the Fallen Tree: Limbing and Bucking
After the tree lands, the work continues. Limbing removes branches while bucking cuts the trunk into manageable logs or firewood. Both tasks require focus and caution.
Limb from the Base to the Top
Work from the stump end toward the treetop. Cut small branches first, then progress to larger ones. Never stand directly over the saw bar. Keep the chain tip clear of the ground and debris to avoid kickback.
Cut Under Tension Safely
Follow these guidelines for branches under tension:
- Hanging branches: Cut from the top down.
- Branches on the ground: Cut from underneath to prevent pinching.
- Large limbs: Make relief cuts to release tension before final removal.
Always position your body to the side of the cutting plane, never directly behind it.
Buck the Log into Firewood
Measure and mark cuts with a tape measure. Cut any rot out of the butt end before processing. For logs supported at both ends, cut halfway through, then roll the log and finish from the opposite side to avoid pinching. Place small logs or firewood pieces under suspended sections to prevent bar bind.
Pro Tip: Cut firewood slightly longer than needed, such as 16 inches for a 14-inch stove, then trim after splitting.
Avoid Dangerous Mistakes
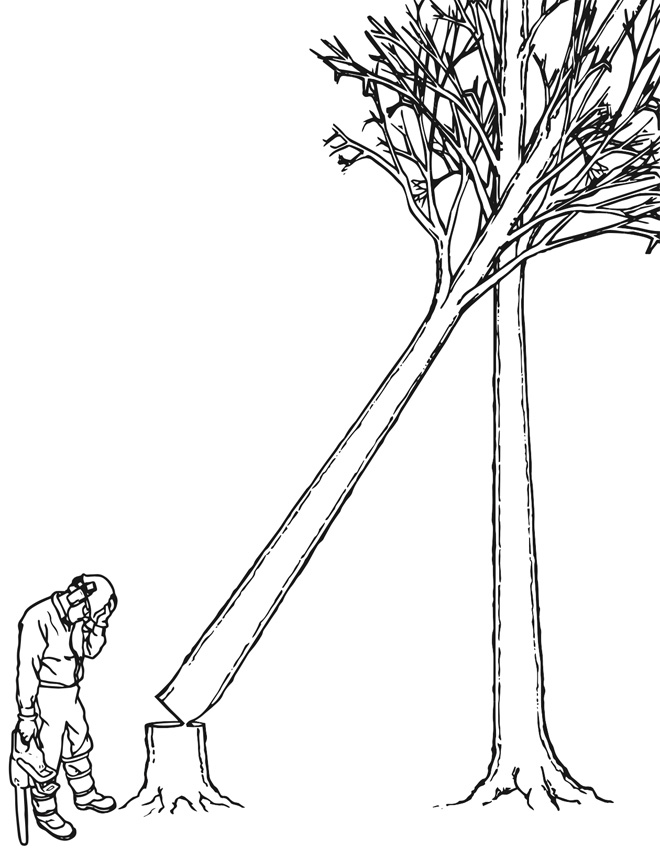
Even experienced operators make fatal errors. Understanding these common failures helps you avoid them.
Don’t Create a Barber Chair
A barber chair occurs when the tree splits vertically up the back. Common causes include:
- Face cut deeper than 50 percent of the trunk.
- Felling cut placed too high above the face.
- No proper hinge left intact.
The split can snap back toward the operator at high speed and is often fatal.
Never Cut with the Bar Tip
The top quarter of the bar tip is the most dangerous section. Contact with wood or hard objects causes kickback, which can throw the saw into your face or body. Keep the tip free of contact whenever possible.
Don’t Work Alone or When Tired
Fatigue clouds judgment and slows reaction time. If you must work alone, tell someone your location and expected return time. Carry a charged phone or satellite communicator. Take breaks every 30 to 45 minutes to maintain focus.
Maintain Your Equipment and Skills
Chainsaw safety depends on consistent preparation and ongoing practice. A sharp, well-maintained saw reduces kickback risk and improves cut quality.
Sharpen and Service Regularly
Sharpen the chain after every 2 to 3 trees. Clean the bar groove and replace the bar if it shows wear or damage. Inspect the sprocket and replace it if the chain skips during operation.
Practice on Small Trees First
If you are new to felling, start with trees under 8 inches in diameter. Practice face cuts, felling cuts, and escape drills until they become automatic. Consider a hands-on course from a local extension office or forestry service for additional training.
Frequently Asked Questions About Cutting Down a Tree with a Saw
What size tree can a beginner safely cut down?
Beginners should start with trees under 12 inches in diameter on flat ground. Small, healthy trees with a slight natural lean toward an open area are ideal for learning proper technique.
How deep should the face cut be?
The first horizontal cut should penetrate no more than 20 to 30 percent of the trunk’s diameter. Cutting deeper weakens the hinge and increases the risk of a barber chair split.
When should I call a professional to cut a tree?
Call a licensed tree service if the tree stands near power lines, buildings, or vehicles. Also seek professional help for trees showing signs of rot, heavy lean in an unsafe direction, or significant dead branches overhead.
How far should bystanders stay from a tree being felled?
Bystanders should remain at least twice the tree’s height away from the work area. A tree 40 feet tall requires an 80-foot clearance radius to protect against falling limbs and debris.
What causes chainsaw kickback?
Kickback occurs when the upper tip of the bar contacts a solid object while the chain is moving. This sudden stop throws the saw backward toward the operator. Keeping the bar tip clear of wood and debris prevents most kickback incidents.
Can I fell a tree in windy conditions?
No. Wind overrides cut control and can push the tree in an unintended direction. Never attempt to fell a tree during strong or gusty winds, regardless of your experience level.
Key Takeaways for Safely Felling a Tree with a Saw
Cutting down a tree with a saw requires planning, proper gear, and methodical execution. Start by wearing complete PPE including a hard hat, hearing protection, chaps, gloves, and cut-resistant boots. Assess the tree and surroundings for hazards like widowmakers, power lines, and wind before making any cuts.
The face cut controls fall direction. Cut 20 to 30 percent through the trunk horizontally, then angle a second cut at 45 degrees to form a wedge. The felling cut on the opposite side should leave a 1-inch hinge to guide the tree safely. Use plastic wedges for trees over 10 inches in diameter to prevent bar pinch.
Your next step is to practice the cuts on a small, safe tree before tackling larger jobs. If you feel uncertain at any point, walk away and contact a professional arborist. Your safety is worth more than any piece of wood.